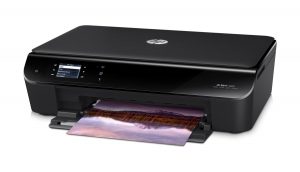
The usual trashpicking yielded a nice HP Envy 4500 AIO with missing top cover on the flatbed scanner.
Before just ripping it to pieces, i wondered how good the WiFi-support/setup was regarding the scanner, so i got it going. It complained about empty cartridges (no surprise here) but eventually i got to setup menu, enabled WPS and got it connected to my home WiFi.
My Mac immediately found it and installed it via Bonjour/AirPrint – no drivers needed (or i already had it on the system)
Scanning seemed to work just fine, so now i was wondering. Could the printer mechanism be discarded and the printer turned into a WiFi-enabled scanner?
First try: Disconnect FFC to the print carriage, boot printer and see what happens. Well, it was not happy. I got an error message in a rather crude font, so it died pretty much early in the boot process, before the “GUI” was up.
So apparently, it needs to talk to the de-serialiser/buffer chip on the carriage. I plugged the cable back in, removed the cartridges and tried again. This time it booted all the way and got onto WiFi. Scanner was still fully usable – Yay!
Next cause of action was to remove that stupid “lid open”-sensor. It’s just an opto-fork on the back side of the control/LCD/panel. Desoldering it from the board will keep it happy (there is a pullup on the receiving phototransistor inside it, so with the component missing, it looks like it’s in darkness – e.g. the lid is closed on the printer).
So, how much else can be unplugged you ask? Well, pretty much everything!
I unplugged cables for “cleaning station”, paper encoder, the two DC-motors and it still booted up – i got a shitload of error messages when doing this, but WiFi still works.
Now i’m pretty long in the modification process, and i come to think of – how do i set this up for a new WiFi-network some other day? – Pressing the buttons on the LCD control panel is of no help. Error messages keep popping up faster than i can navigate the menu – F*ck!
Plugging in back all the stuff yielded me with “No cartridges found” instead of the dreaded “Carriage is stuck” – but still no way to access the menu. At this point i had taken apart the carriage and removed all the mechanics and only kept the PCB with flex cables – so no plugging in back the cartridges!
Then i came to wonder – can you setup WiFi from the software/driver on the computer? – Oh yes you can – Even if your printer is completely bonkers and is reporting more errors than you can count to!
So connecting the printer via USB, and messing around in drivers control panel, calling up the Toolbox, i was able to scan for WiFi-networks, and connect to one. Success!
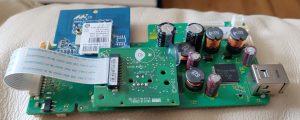
So now i have the machine pretty much sorted out. All the printer mechanism is gone, only the small PCB with the De-serialiser/Buffer is needed. I ripped off the flex cable to the cartridges, desoldered the electrolytic cap and the encoder for the optical strip.
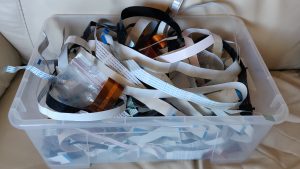
The original FFC from carriage to main board was rather long, so i went into my box of assorted ones to hunt for a shorter replacement. Shortly after i found out the cable i needed was a “flipped” cable – the connections on each end of the FFC is on each side of the cable. I couldn’t find a short cable that was flipped.
I found a reasonable short cable, ripped off the stiffener at the end, cut the cable clean off, and scratched the “back side” of the cable with a knife until the tracks appeared. The stiffener was glued back onto the other side of the cable, and then i had a short, flipped FFC.
The boards was arranged and put on top of each other with some hot glue.
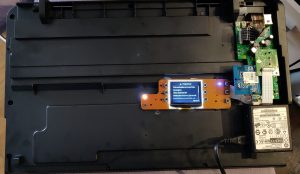
The resulting parts were again hot-glued to the bottom of the scanner case.
Final touch would be some 3D-printed feet so it can sit flat on a table. Right now it’s a bit uneven on the bottom because of the power supply in the front right corner.
I hope this inspired you to do some hacking on your own – Personally i really had no need for an WiFi-enabled scanner. I already have a fine scanner with ADF and all the bells and whistles, but this afternoon project was more like I’ll hack it just because i can!


August 14th, 2018 at 04:51
“I plugged the cable back in, removed the cartridges and tried again. This time it booted all the way and got onto WiFi. Scanner was still fully usable – Yay!”
Hi, if you have have achieved the above, isn’t your goal accomplished? The printer/scanner is already a network enabled one.
A mystery to me i show did you manage to get the scanner working with no ink cartridges? Mine won’t proceed past the boot stage when there are no ink cartridges.
August 14th, 2018 at 05:42
[…] [Zaprodk] had trash-picked a defunct HP Envy 450 AIO, a 3-in-1 printer, scanner, and copier. Normally there usually isn’t much use for these unless you’re willing to hunt down the cartridges which it used, so your next step is to dismantle it for parts. That’s what he was going to do but then decided to see if he could remove as much as possible while leaving just the scanner. […]
August 14th, 2018 at 10:35
Well the goal was to hack it as much as possible 🙂
This one complains a lot. But will still connect to WiFi after a moment and will scan just fine. I know some printers won’t even print black or scan, if one of the colors are depleted.